How to setup and use Raspberry Pis in the classroom
The need for this page came to me after a recent interaction at the 2019 NW Tech Ed Conference in at Clark College in Vancouver, WA. I hear stories constantly of instructors who have purchased or have access to Raspberry Pis but don't use them because they doesn't know where to start, don't know how to get them setup in the classroom, or simply think they are more of a toy than a serious learning platform. My hope here is to layout a series of options for setting up the Raspberry Pis for classroom use. I will try to include any and all possible ways with as much instruction as I can put together. My hope is that this will help instructors get past the fear of "How is this going to work?" and get onto using the Raspberry Pi in their classrooms to teach critical CIS/CS topics to their students. Additionally, I will created a second page with specific activities geared towards CIS/CS courses where the Raspberry Pi can be used to teach specific topics. I hope you find these resources useful.
Raspberry Pi Only Desktops
Shared with Desktop PCs
Remotely Connected Raspberry Pis (No Physical Access)
Remotely Connected Raspberry Pis (Physical Access)
Network Boot
Desktop PC (Raspberry Pi OS Desktop) with Raspberry Pi Zeros
Network connected with Remote GPIO
Headless Setup
By ALEXOY, ANDY
What if I don't HAVE a HDMI cable, or a spare keyboard, or a spare mouse? Yeah, I do, but still, what if I didn't. I'm not sure why this is bothering me so much (the idiocy of not fixing an easily fixable known HDMI issue is what got me started, I guess), but it is. So, I decided to take my own sort of "extra credit" project about fixing it (If you actually want to give me extra credit, that would be cool Kerry... (wink) ).
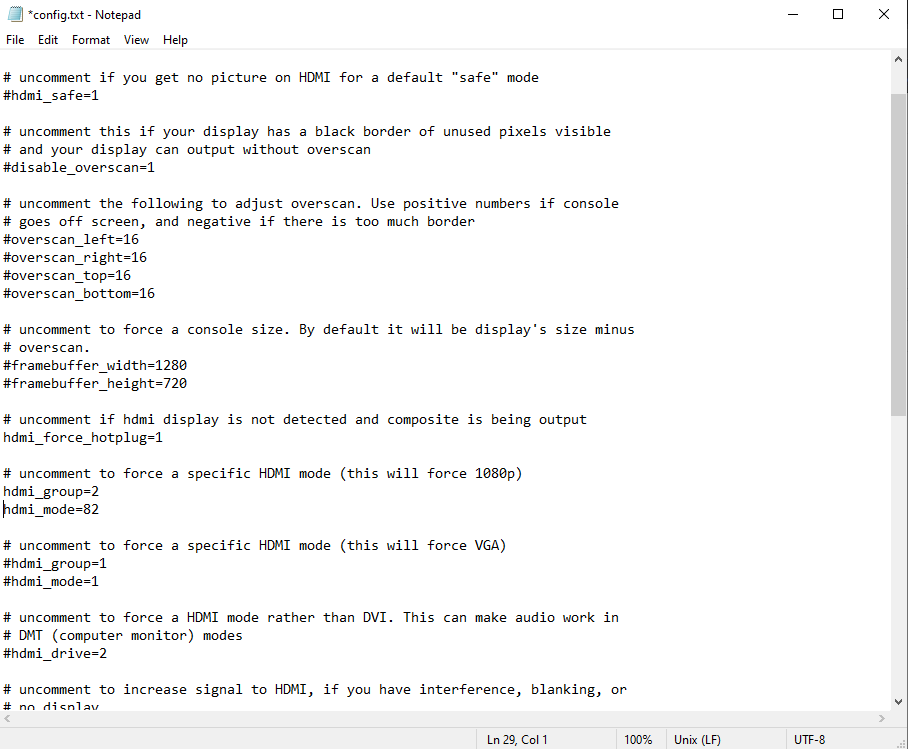
You can fix the known HDMI issue (see above postings) in Windows (or Macintrash, Linux, whatever) directly on the SD card (right after running the imager), as it turns out, by editing the config.txt directly there. As before, uncomment "hdmi_force_hotplug=1" (and this time I added my own section for 1080p, then uncommented it).
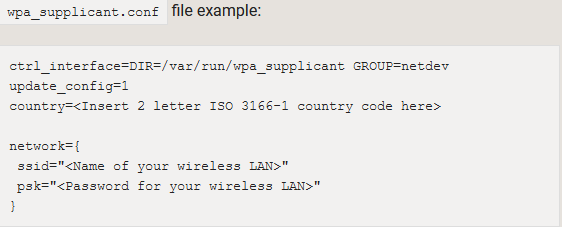
Now that video is sorted (and 1080p enabled), I still have to deal with needing a Keyboard/Mouse to get connected to wifi and such.... or do I?? (Spoiler... No, I don't.) Instead of all that noise, I can just create a file called "wpa_supplicant.conf" and in it, I need to include the following (obviously replacing the <> information with real info, it's probably obvious, but our country code is us):
Now that video is sorted (and 1080p enabled), I still have to deal with needing a Keyboard/Mouse to get connected to wifi and such.... or do I?? (Spoiler... No, I don't.) Instead of all that noise, I can just create a file called "wpa_supplicant.conf" and in it, I need to include the following (obviously replacing the <> information with real info, it's probably obvious, but our country code is us):
Then, we also need to be able to SSH in, and that was perhaps the simplest fix of all. Just create a blank document called "ssh". Don't need (or want) anything in it. Just make the file called "ssh" (no .txt, or anything behind it) in the root directory. Take SD card (after properly ejecting it from your OS first), put in raspberry (make sure it's off first!), power up and give it a moment (I usually give about 2 mins to be safe).
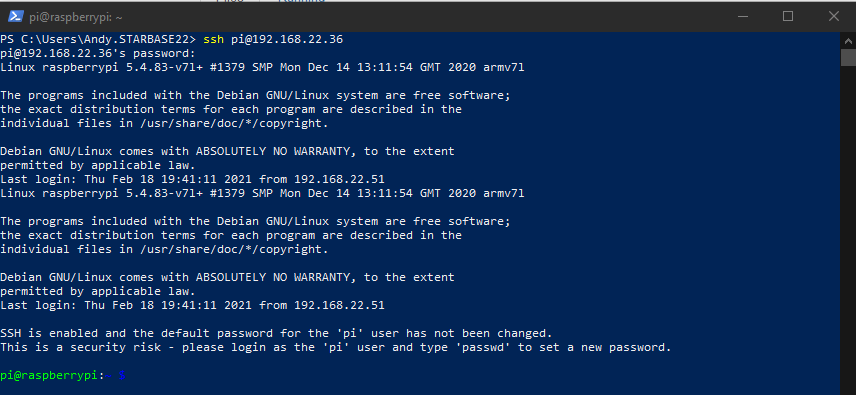
At this point you'll need a way to check for the IP it's going to get (Advanced IP Scanner, access to your router's DHCP table, whatever). Some sage advice (*tries to look stoic*), if you can't figure out which IP on the scan (or on DHCP online table) is the Raspberry, turn it off, wait a min or two, check, then turn it back on, wait a min or two, check again, the new one, is the Raspberry. You'll need this, as you'll have to know what IP to SSH to. You can PuTTY into it, or just use PowerShell (ssh pi@raspberrypi or ssh pi@<ip address>). Default Raspberry user is "pi" and default password is "raspberry" (obviously you'll want to change these later, but you'll probably want to enable VNC first).
At this point you'll need a way to check for the IP it's going to get (Advanced IP Scanner, access to your router's DHCP table, whatever). Some sage advice (*tries to look stoic*), if you can't figure out which IP on the scan (or on DHCP online table) is the Raspberry, turn it off, wait a min or two, check, then turn it back on, wait a min or two, check again, the new one, is the Raspberry. You'll need this, as you'll have to know what IP to SSH to. You can PuTTY into it, or just use PowerShell (ssh pi@raspberrypi or ssh pi@<ip address>). Default Raspberry user is "pi" and default password is "raspberry" (obviously you'll want to change these later, but you'll probably want to enable VNC first).
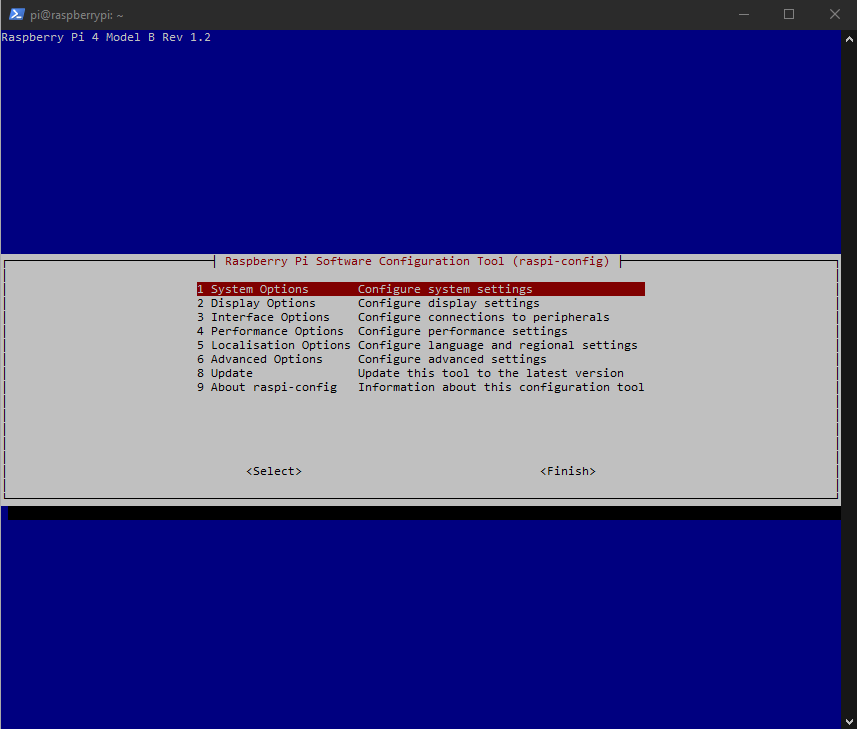
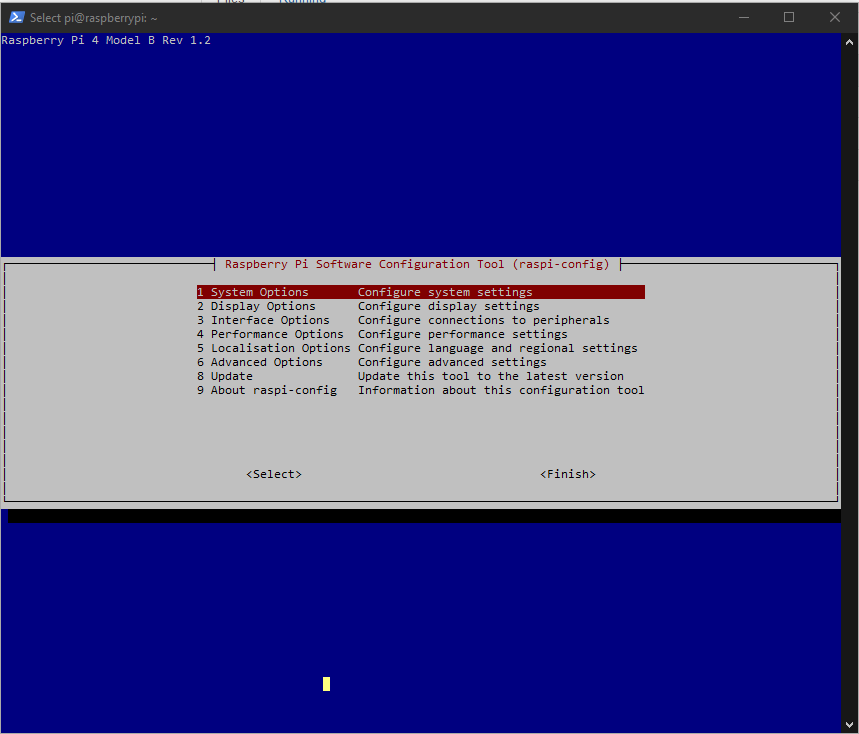
We are now SSHed into our Raspberry. The last thing we need to do, is give ourselves VNC access (so we can Real VNC into it, and do everything else, like update it, change password, etc.). To do that, we'll have to enable VNC (I wasn't able to find a .conf file way to do it, although one may exist, which is why I'm doing it via SSH). The command we need (or at least one way to do it, there are a ton of ways to do things CLI, of course) is "raspi-config" (don't forget to sudo first). That will give us something like "sconfig" in Windows Server CLI (for those of you in that class too).
That will give us:
And from here we need to select option 3, Interface Options:
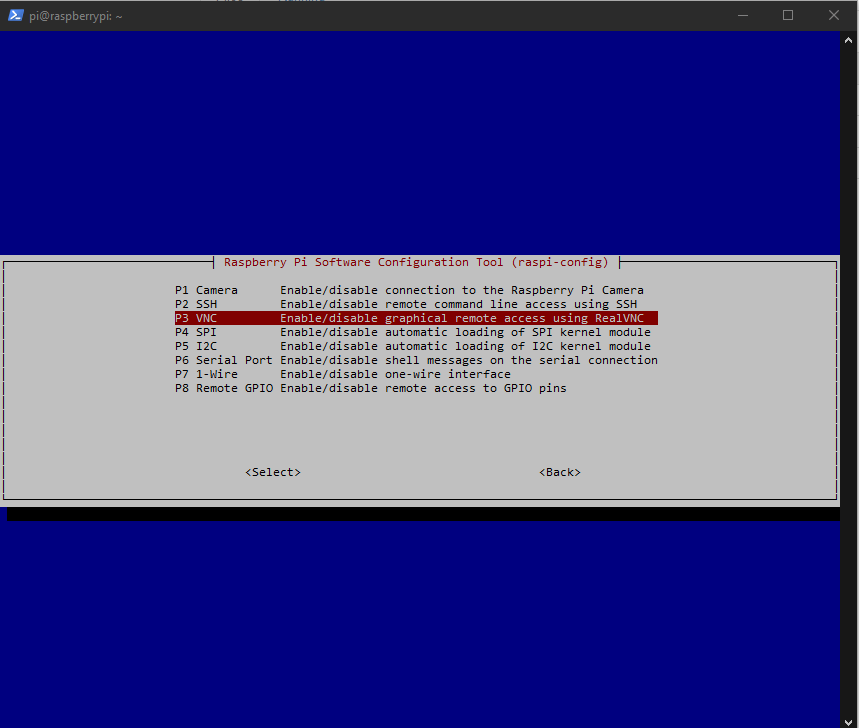
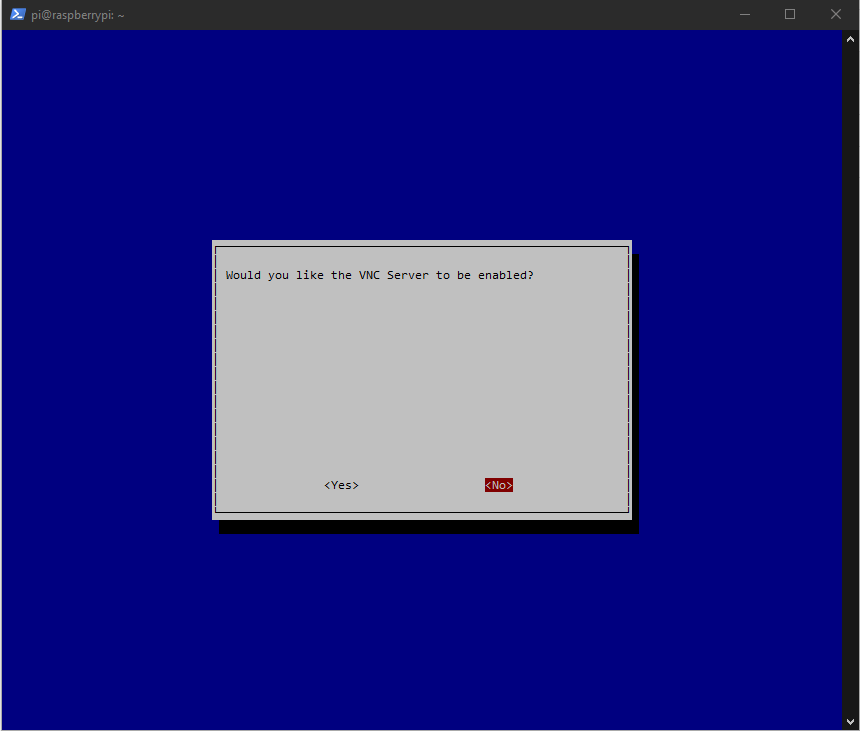
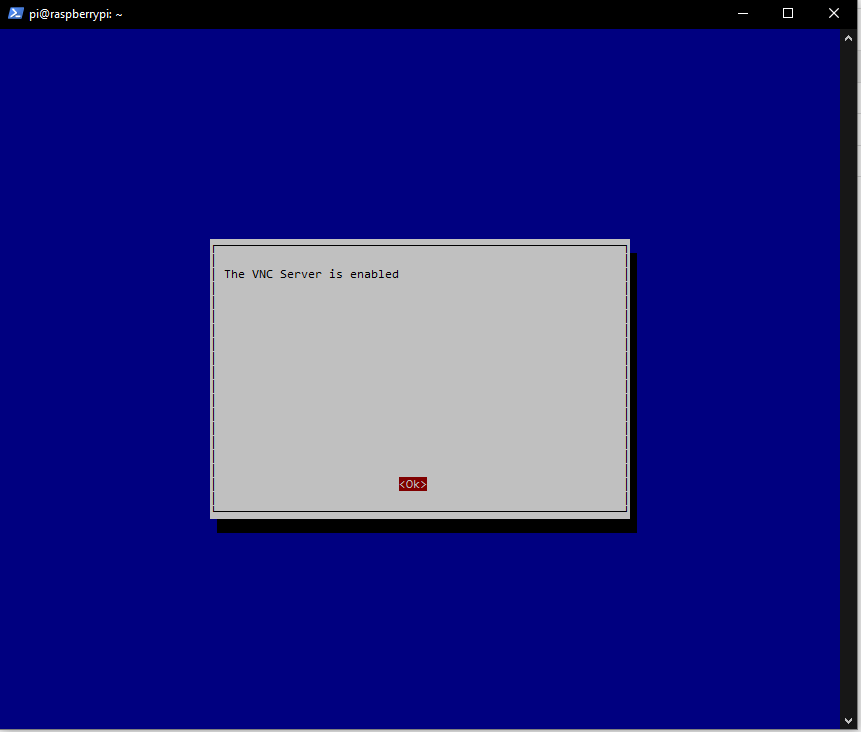
Then VNC (also option 3), and say YES to the VNC Server question:
Our VNC is now active, and we can use Real VNC, to connect to the IP (which we now know), and make all the appropriate changes. Truly headless (if not annoying that they didn't have a way to do this all a bit easier). Just finish on this, and you can even close SSH now (if you wish). I hope this helps some people out.
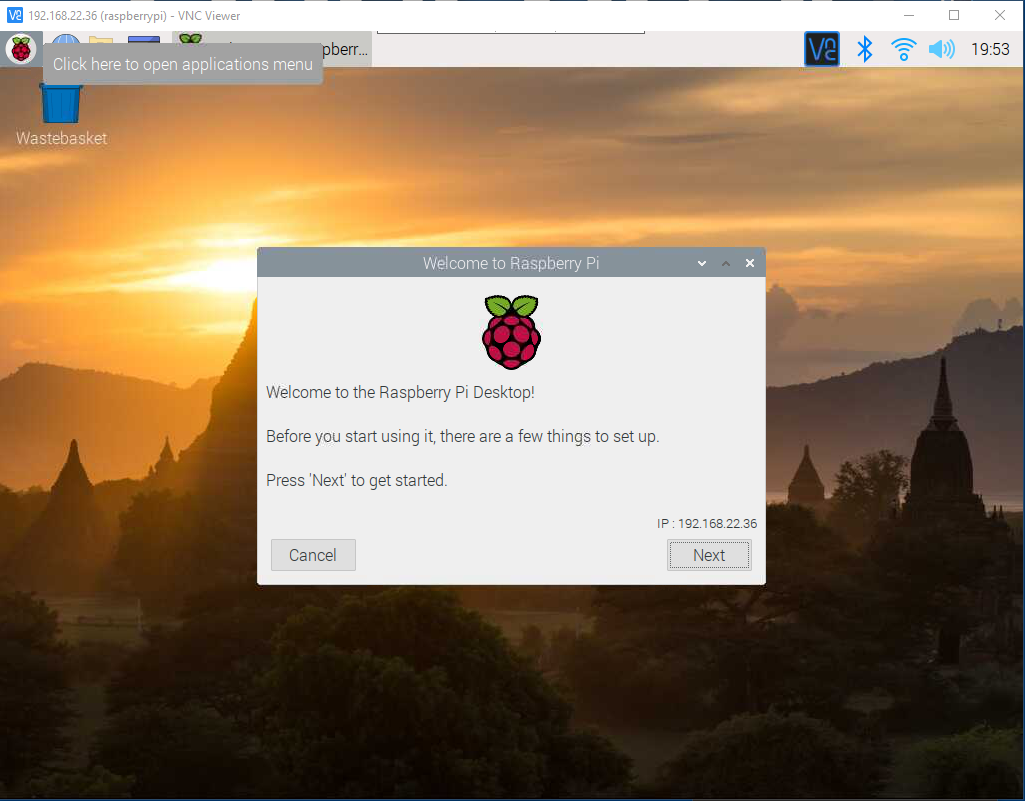
One final addition to this. Keep in mind, that for security reasons, files added (wpa, ssh), once used in inital boot, WILL be deleted after that boot. So, if you want this to be a permanent thing, you'll still have to go through the core setup (go into pi settings and perm enable SSH, etc.). Otherwise, you'll have to re-add those files (which isn't a huge deal really but annoying) again on next boot to access it. The first thing it does (as you can see on my connected to VNC screenshot), is go through setup (so just actually go through setup, basically the way Kerry showed in class, from this point on).

